I’ve made my own Christmas jumpers this year! What do you think? After a quick rummage in my local charity shop I found three different types of jumpers just calling out to be upcycled, so I thought I’d share this heat-transfer vinyl project with you so that you too can make your own festive jumper this Christmas…
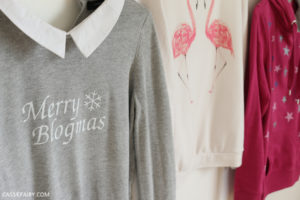
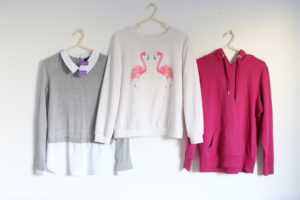
I went to the local Barnardos charity shop and found the three jumpers below for less than £10, what a bargain! I’ve chosen a printed jumper, a knitted jumper with attached shirt, and a hoody. When I spotted them on the rail I could already imagine them with a fun pattern or festive design so I whisked them home and set to work.
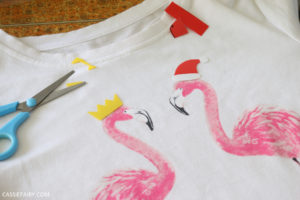
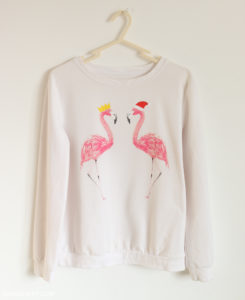
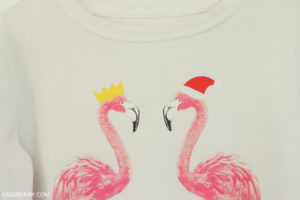
The first jumper I upcycled was the flamingo jumper. As soon as I saw the printed flamingo design I wanted to add festive hats to them so that’s what I did. I used heat-transfer vinyl and cut out a red Santa hat with white trim and a yellow Christmas cracker crown. I made a template from paper first just so that I could get an idea of the size and shape of the hats before I started cutting out the vinyl. The only other step to carry out was pressing the vinyl onto the jumper.
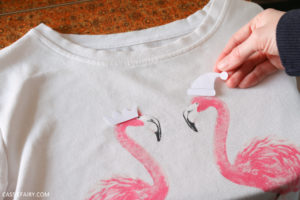
I carefully positioned the vinyl with the sticky side down and used an iron to press the red part of the Santa hat in place. You would usually peel off the acetate backing at this stage but if you’re applying more heat, you’ll need to keep it in place otherwise the vinyl will melt when you press it a second time. I therefore peeled the bottom of the acetate away and tucked the white parts of the Santa hat underneath the backing. This way I could apply more heat to attach the white parts without ruining the red hat.
I wanted to wear the knitted jumper to a blogger meet-up event so I chose to add the phrase ‘merry blogmas’ to the front. You can cut out the text yourself but I wanted to use a vintage-looking script font so I used a paper-cutting machine to do this intricate work. I programmed the text into the cutter, scanned in the vinyl sheet and positioned a snowflake beside the text.
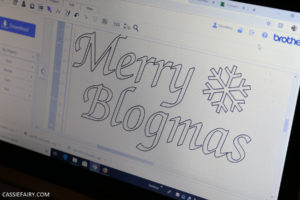

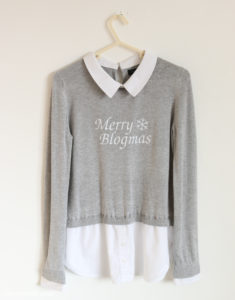
The cutting machine only took a couple of minutes to cut out the text from the vinyl and the only tricky part was removing the vinyl from around the edges of the lettering. I carefully peeled away the excess vinyl, leaving the text on the acetate backing. I then positioned my homemade ‘transfer’ and ironed it onto the centre of the jumper. It looks so pro!
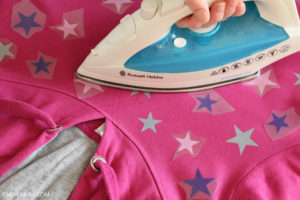
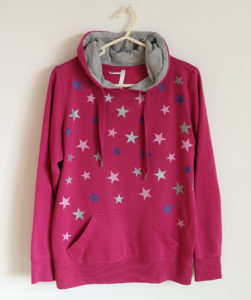
My final festive jumper used up all the off-cuts of heat-transfer vinyl I had lying around. I cut two different sizes of stars from pink, silver and purple vinyl. You can use a star-shaped hole punch to cut out the stars – or use any shape you like! A snowflake design would look great for a festive jumper. In this instance, I had to position all of the stars at once and then iron them all on together. Lay out your jumper and iron it so that it’s completely flat. Add the stars at random and follow the ironing instructions that come with the vinyl to attach them to the jumper.
I’m pleased to report that I wore the Merry Blogmas jumper to the festive blogger meet-up and noone could believe that I’d made the jumper myself! I’m so happy that I had a go at using heat-transfer vinyl because there’s no stopping me now! I’ll be adding my own designs to all kinds of clothing from now on, and it gives me a good excuse to continue rummaging through my local Barnardos stores in the future!
![]()

What do you think of my 3 new Christmas jumpers? I’m sure I’ll wear the star jumper all year round! Let me know if you’ve made your own festive jumper before or share your ideas for a festive project in the comments below.
PIN THIS PROJECT FOR LATER..!
![]()